使用 Consul+Fabio+Registrator 部署集群
整体结构
集群部署
使用 Consul 做服务发现,在中心服务器部署 consul server,各服务器部署 client、 Fabio 和 registrator,将服务自动注册到consul。服务启动时可以向 docker 传递环境变量,设置自己在 consul 的 name 和 tag 等。
使用 Fabio 做负载均衡,从 Consul 注册表读取健康的服务,配置自己的 route 表,根据配置的权重做负载均衡。Fabio 根据 consul tags 的格式可以配置 strip,切分请求 URL,再将流量传递到相应服务。
使用 Fabio 的优点是一个服务调用其它服务时无需关心 consul 集群的位置,只需知道服务名,然后调用本地 4666 端口,由 Fabio 转发到对应服务。另外一个好处是不需要手动配置路由表,更改服务也无需重启 Fabio。
Node 节点负载均衡
服务部署在 AWS Ec2 云服务上,将其中几台作为 node 节点部署 Fabio 和 Consul server,总流量通过 AWS 提供的弹性负载均衡器(Elastic Load Balance,ELB)分发到不同 node。
Nginx 反向代理
域名解析指向 node 集群,在 node 上使用 nginx 做反向代理,根据请求的 URL 将流量分发到 Fabio 或者直接到服务,控制访问权限。
项目实例
consul server 部署
单独选择一台或多台稳定的服务器部署 consul server, 例中用了 10.2.26.83
在/etc/consul_server/目录下创建配置文件 basic_config.json,写入配置
1
2
3
4
5
6
7
8
9
10
11
12
13
14
15
| {
"skip_leave_on_interrupt": true,
"bind_addr": "{{ GetAllInterfaces | include \"network\" \"10.2.0.0/16\" | attr \"address\"}}",
"client_addr": "0.0.0.0",
"bootstrap_expect": 2,
"raft_protocol": 3,
"protocol": 3,
"retry_join": ["provider=aws tag_key=Role tag_value=consul"],
"ui": true,
"dns_config": {"service_ttl":
{"*": "1s",
"redis": "300s"},
"enable_truncate": true,
"only_passing":true}
}
|
docker 以 server 模式启动 consul
1
2
3
4
5
6
7
8
| docker run \
--name=consul-server \
--net=host \
-e AWS_ACCESS_KEY_ID=xxxx \
-e AWS_SECRET_ACCESS_KEY=yyyy \
-e SERVICE_IGNORE=true \
-v /etc/flybear/consul_server:/consul/config \
--restart=always -d consul:1.0.2 agent -server -bootstrap-expect=1 -node=server-1
|
其中,
-bootstrap-expect=1 在单节点部署时必须加上,可以选举自己为 leader 节点。如果有多台 server 服务器则可不加
-node 在集群部署时必须,单节点可不加
使用 docker ps查看启动情况

已经成功启动,使用 docker exec consul-server consul members查看集群

目前只有一个 server 节点。使用docker exec consul-server consul info查看当前节点信息
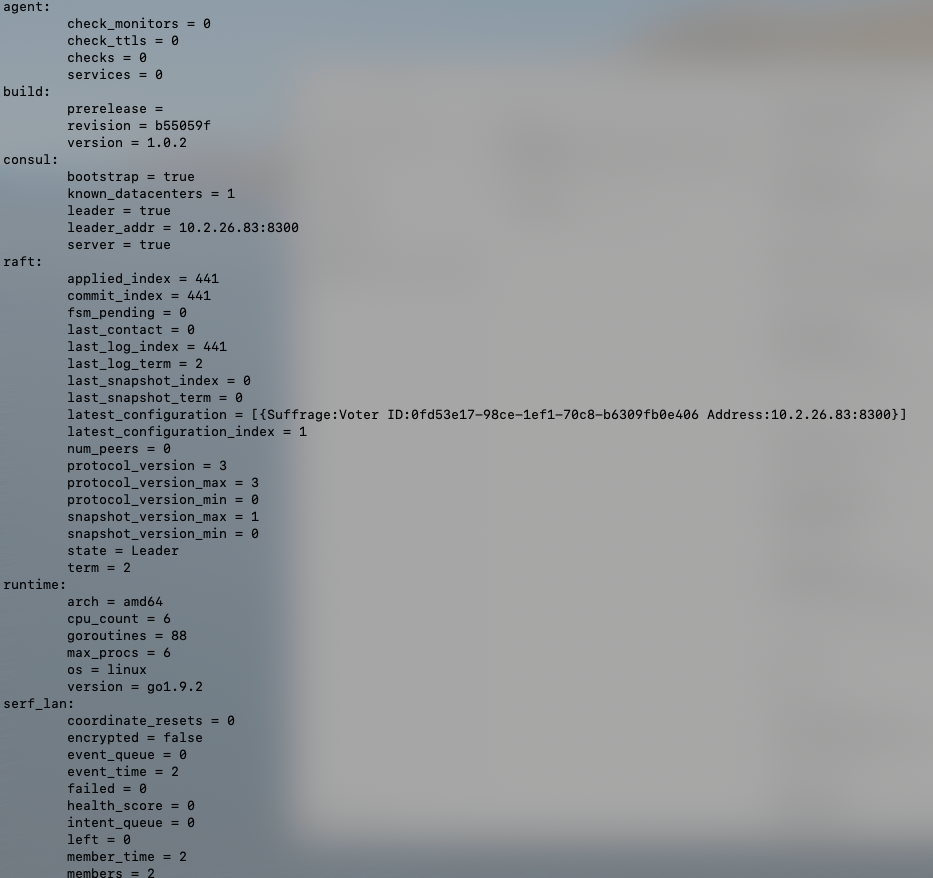
可以看到被选举为 leader 节点
consul client 部署
登录服务器10.2.26.88,在/etc/consul_client/目录下创建配置文件 basic_config.json,写入配置
1
2
3
4
5
6
7
8
9
10
11
12
13
14
15
| {
"leave_on_terminate": true,
"enable_script_checks": true,
"bind_addr": "{{ GetAllInterfaces | include \"network\" \"10.2.0.0/16\" | attr \"address\"}}",
"client_addr": "0.0.0.0",
"retry_join": ["provider=aws tag_key=Role tag_value=consul"],
"ui": true,
"raft_protocol": 3,
"protocol": 3,
"dns_config": {"service_ttl":
{"*": "1s",
"redis": "300s"},
"enable_truncate": true,
"only_passing":true}
}
|
docker 以 client 模式启动 consul
1
2
3
4
5
6
7
8
| docker run \
--name=consul-client \
--net=host \
-e AWS_ACCESS_KEY_ID=xxxx \
-e AWS_SECRET_ACCESS_KEY=yyyy \
-e SERVICE_IGNORE=true \
-v /etc/flybear/consul_server:/consul/config \
--restart=always -d consul:1.0.2 agent -retry-join=10.2.26.83 -node=client-1
|
加入之前的 server,docker ps查看启动成功后,执行docker exec consul-client consul members

已经成功加入集群
Registrator 部署
执行
1
2
3
4
5
| docker run \
--name=registrator \
--net=host \
-v /var/run/docker.sock:/tmp/docker.sock \
--restart=always -d registrator -ip "10.2.26.88" -explicit --deregister-on-stop consul://localhost:8500
|
-ip 指定本机 ip,用于 consul 的健康检查
Fabio 部署
虽然 fabio 可以零配置,但也可以自定指定一些想要的配置。在/etc/fabio/目录下创建配置文件fabio.properties,写入
1
2
3
4
5
6
| proxy.addr = :4666,:3021;proto=tcp
proxy.strategy = rr
registry.consul.addr = localhost:8500
registry.consul.register.enabled = false
metrics.statsd.addr = localhost:8125
log.level = ERROR
|
然后使用 docker 启动 Fabio
1
2
3
4
5
6
7
8
9
10
| docker run \
--name=fabio \
--net=host \
-e SERVICE_9998_NAME=fabio \
-e SERVICE_9999_IGNORE=true \
-e SERVICE_3021_IGNORE=true \
-e SERVICE_4666_IGNORE=true \
-v /etc/fabio/fabio.properties:/etc/fabio.properties:rw \
--restart=always -d fabiolb/fabio:1.5.2-go1.9 \
./fabio -cfg /etc/fabio.properties
|
访问集群中任意一台服务的8500端口,查看 consul的可视化页面。

可以看到 registrator 已经自动将 fabio 注册到 consul 了
服务部署
从 docker 拉取服务镜像,使用 docker 部署
1
2
3
4
5
6
7
8
9
10
11
12
13
14
15
16
17
18
19
20
21
22
23
24
25
26
27
28
29
30
31
32
33
34
35
36
37
| docker run --init -d --net=host \
-v /logs/flybear-api/logs:/logs \
-v /etc/flybear/keyfile_dev.json:/etc/keyfile_dev.json \
-v /etc/flybear/tl-apns-ent-test.p12:/etc/tl-apns-ent.p12 \
-v /home/ubuntu/apollo:/opt/data \
-e SERVICE_NAME=flybearapi \
-e SERVICE_TAGS='urlprefix-/services/flybearapi strip=/services/flybearapi' \
-e SERVICE_CHECK_HTTP='/healthy' \
-e SERVICE_CHECK_INTERVAL='15s' \
-e SERVICE_CHECK_TIMEOUT='1s' \
-e SERVICE_80_CHECK_HTTP=/ \
--name=flybearapi \
--restart=always flybear/flybear-api-snapshot:0.0.4-SNAPSHOT \
java \
-server \
-XX:+UseG1GC \
-Xms512M -Xmx512M \
-Xloggc:/logs/gc-`date +%F_%H-%M-%S`.log \
-XX:+PrintGCDetails \
-XX:+PrintGCDateStamps \
-XX:+PrintGCTimeStamps \
-XX:+PrintGCCause \
-XX:-PrintTenuringDistribution \
-XX:+UseGCLogFileRotation \
-XX:NumberOfGCLogFiles=5 \
-XX:GCLogFileSize=2M \
-XX:+HeapDumpOnOutOfMemoryError \
-Dcom.sun.management.jmxremote \
-Dcom.sun.management.jmxremote.host=127.0.0.1 \
-Djava.rmi.server.hostname=127.0.0.1 -Dcom.sun.management.jmxremote.port=9099 \
-Dcom.sun.management.jmxremote.authenticate=false \
-Dcom.sun.management.jmxremote.ssl=false \
-Dspring.boot.admin.client.enabled=true \
-Xdebug \
-Xrunjdwp:transport=dt_socket,server=y,suspend=n,address=5005 \
-jar \
target/app.jar
|
指定了注册到 consul 的 name 和 tag 等信息。等待部署完成后到 consul 页面查看
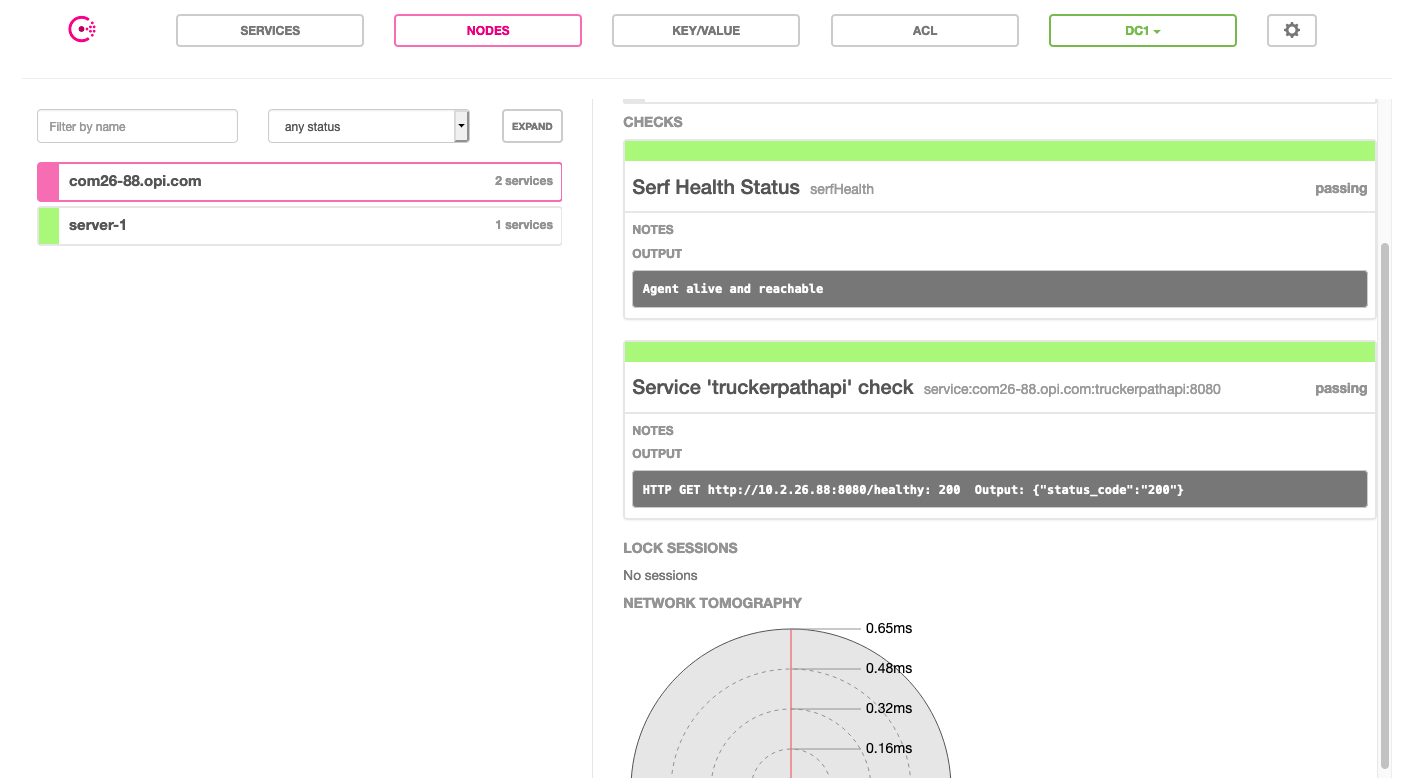
健康检查通过,服务成功注册。再访问9998端口查看 fabio 的页面
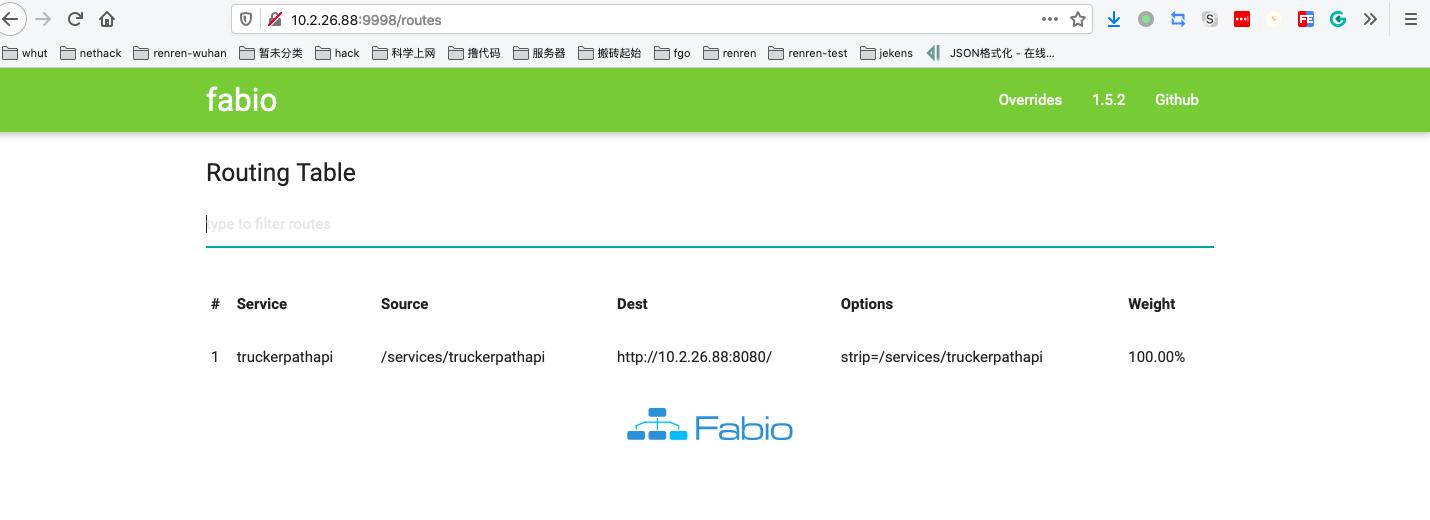
Fabio 已经根据 tag 进行了 url 的切分
Nginx 配置
1
2
3
4
5
6
7
8
9
10
11
12
13
14
15
16
17
18
19
20
21
22
23
24
25
26
27
28
29
30
31
32
33
34
| upstream fabio {
server 127.0.0.1:4666 max_fails=0 fail_timeout=1s;
}
upstream webservers {
server 172.31.0.1:8080;
server 172.31.0.2:8080;
server 172.31.0.3:8080;
}
server {
listen 80;
gzip on;
gzip_types application/json;
gzip_proxied no-cache no-store private expired auth;
gzip_min_length 1000;
server_name flybear.com;
access_log /var/log/nginx/host/access.log combined_plus;
error_log /var/log/nginx/host/error.log error;
location /internal {
return 404;
log_not_found off;
}
location / {
proxy_pass http://fabio;
}
location = /test {
proxy_pass http://webservers;
}
}
|
可以控制内部接口不允许公开访问,将一些特殊地址转向特定服务器等